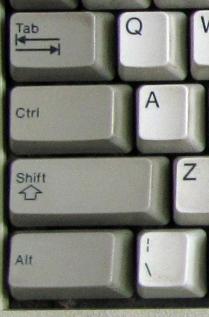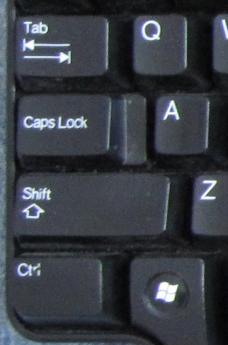
Note the position of the Control key, labeled "Ctrl". It's to the left of the A, and above the Shift key. The Caps Lock key is not shown - it's way over to the right side of the space bar. You can click on the image to see the entire keyboard, and return here with the "Back" button. The keyboard layout was gradually improved. If you're interested, you can see the whole history, in much more detail than you probably care to know, here. The changes didn't affect the basic layout of the letters, of course. The letters remained in the classic "QWERTY" arrangement that generations of typists had gotten used to. But subsidiary keys such as Ctrl, Alt, and Caps Lock were moved around.
Around that time, I got a new computer at work, which came with one of the newer keyboards, Caps Lock above the Shift key. I set up the computer, and verified that it worked, keyboard (new style) and all. But I was still using an old-style keyboard at home, Ctrl above the Shift key. I was annoyed at the thought of having to shift back and forth between these two layouts. But then I noticed that my new keyboard could be changed back to the old layout! It came with a couple of extra keycaps in a small zip-lock baggie, with instructions as to how to exchange them for the keycaps already in place. The Ctrl and Caps Lock keycaps in place couldn't be just swapped, because they were different sizes - that's why extra keycaps, with the labels reversed, had been included. So to keep my keyboard at work in the same layout as my keyboard at home, I installed the extra set of keycaps. There was one more thing that needed to be done. Although the key above the Shift key now said Ctrl on it, it still functioned as a Caps Lock key. Just changing the keycap, obviously, hadn't changed the code sent electronically to the PC when that key was pressed. The instructions told me that after changing the keycaps, I had to turn the keyboard over, and flip a small switch that could be seen through an opening in the bottom. That caused the keyboard to interchange the codes sent to the PC when the Ctrl and Caps Lock keys were pressed. I followed these instructions, and Voilà, I had a brand new old-style keyboard, with the same layout as the keyboard I used at home. I put the keycaps I had removed into the zip-lock baggie, stored them in a desk drawer, and taped a note to the bottom of the keyboard so I'd remember where they were. I knew that I'd eventually have to make the transition to the new keyboard layout. And indeed, a year or so later, I got a new computer at home. Note 2 So I pulled out the original keycaps from my desk drawer, and snapped them into place, with the Caps Lock above the Shift key. I turned the keyboard over, and flipped the switch on the bottom back to its original position. And it didn't work! The key above the Shift key, now labeled Caps Lock, still functioned as a Ctrl key. I tried it with the switch in both positions, but it still acted the same. It was permanently an old-style keyboard, no matter what the labels on the keycaps said, and no matter how many times I flipped the switch. I was mystified. I knew that when I had first received the keyboard, it had worked as a new-style keyboard, and I had converted it to an old-style keyboard by changing the keycaps and flipping the switch. The switch had worked back then. I had just flipped the switch back to its original setting. How could the switch fail to work the second time it had been thrown in its entire life? It was a mystery. Well, it wasn't my job to fix keyboards - Kronos had a support department for things like that. Perhaps when they repaired my keyboard, I could ask them to tell me what had gone wrong with it. I carried the keyboard to their office, explained the problem, handed the service rep my keyboard, and asked if they could fix it. He said, "Sure." Without leaving his chair, he pulled a new keyboard in a box from a nearby shelf, and tossed my keyboard into a garbage can. These days, I can buy a new PC keyboard for less than ten dollars. Back then, they cost $50 or $60, but it was still cheaper to replace them entirely than to devote expensive labor to trying to fix them. I accepted the new keyboard, but said, "Can I also keep the old one?" "Sure", he answered again, fishing it out of the garbage can. Okay. You know how curious I am. I just had to know how a switch could fail on its second use. So when I had some free time, I took the old keyboard apart. And here's what I found out.
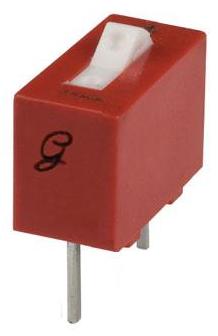
To "throw" tiny switches of this type (change them from OPEN to CLOSED or from CLOSED to OPEN), the "rocker" protruding from the top is pressed, generally using a pencil point, or, even better, a ballpoint pen with its tip retracted. When you press one side of the rocker down, the other side pops up. You press one side of the rocker to CLOSE the switch (that is, turn it ON, allowing electrical current to flow through it), and the other side of the rocker to OPEN the switch (that is, turn it OFF, blocking the flow of electrical current). Most of the electronic components of the keyboard, including the keys themselves, were mounted on the top surface of its printed circuit board, which was then wave-soldered (see my blog entry Connections (bis)). But to make this switch accessible from the bottom of the keyboard, it was mounted on the underside of the board, and its two leads were soldered to copper foil traces on the top of the board. This had to be done by hand after the wave soldering, as a so-called "secondary operation". The keyboard had arrived with the switch in the CLOSED position, which caused the circuit to operate as a "new-style" keyboard. Showing the printed-circuit board upside-down, here's how it started: 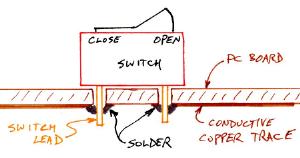 With the keyboard in that upside-down position, using the tip of a ballpoint pen, I had pushed down on the rocker to OPEN the switch: 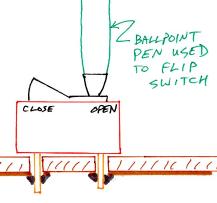 At least, that's what I thought I had done. But unbeknownst to me, the tiny switch had been improperly installed on the board. Whoever had inserted it and soldered it onto the board hadn't seated the switch body firmly against the board. Instead, no doubt accidentally and without being noticed, it had been mounted it at an angle, something like this:  So when I had pushed down on the switch with my ballpoint pen, I had not just switched the rocker from the CLOSED to the OPEN position. I had also, without being aware of it, pressed the entire switch body down flat onto the board. And on the other side, this had pulled the copper trace off the board, severing it. The circuit was now permanently OPEN, regardless of the position of the switch rocker (although I wouldn't find this out for over a year): 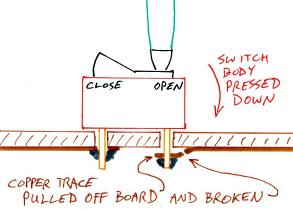 To give you an idea of what I saw when I looked at the switch lead protruding from the bottom of the (upside-down) printed-circuit board, see the pictures below. On the left, what it should have looked like. On the right, roughly what I saw: 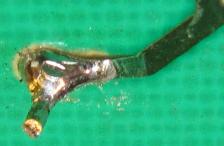 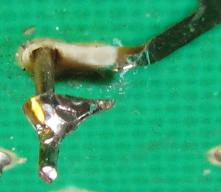 Note that I don't still have the keyboard in question. I recreated the images above to show you approximately what it looked like (ah, what won't I do for my readers?). Actually, after determining what the problem was, I fixed the original keyboard to make it switchable once again, by bridging the gap in the trace with a short piece of wire and some solder. But since I had a nice new (and clean) keyboard, I put the repaired one aside. And lo and behold, it found a use! A month or two later, a message appeared on a company bulletin board from someone asking if anyone had an old-style keyboard that he could use - he hadn't yet gotten used to the new ones. "Yes", I answered, "come and get it." So in fact, I gave it away. Perhaps if I hadn't, hoarder that I am, I might have still had it. And: mystery solved. There was nothing wrong with the switch itself, but its being incorrectly mounted caused the circuit to fail - on only the second time it was used. Solving these real-life mysteries gives me much more satisfaction than I could get from any mystery novel (I read almost no fiction). One of the great pleasures of my engineering career has always been technical problem solving, and I was very good at it. Some of the problems I solved are chronicled in my blog entries Coming to Kronos, Personalities, The house of turkey death, and Micronetic Systems. And there are still other stories to tell - stay tuned.
  Note 1: "PC" here stands for "Personal Computer". But there are drawings later in this entry where "PC" is followed by the word "board". There it stands for "Printed Circuit". I'm sure you can figure it out from the context. [return to text] Note 2: I had to replace my trusty Heathkit/Zenith PC clone because it was just too slow to run the newer software that was coming out. The final straw was when it proved impossible to use it to run the DOS game program Leisure Suit Larry in the Land of the Lounge Lizards. The game's main character "Larry Laffer" was actually shown walking through the various scenes: 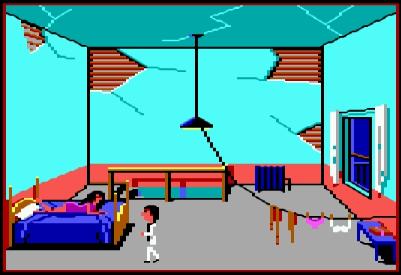 But later releases of the game required more powerful processors, so that eventually the graphics showing Larry's progress became too slow for reasonable play. "Were downloads from the Internet also too slow?", I hear you ask. What Internet? This was the mid eighties. There was no Internet. Computer graphics have obviously come a long way. The Larry Laffer character seems to comprise about 83 pixels, total. [return to text]
 |
